The first post in this series developed into a design manifesto - a retrospective on everything I’ve learned both as a designer and music lover.
Never lacking something to say, it quickly became apparent that this would be a multi-part series.
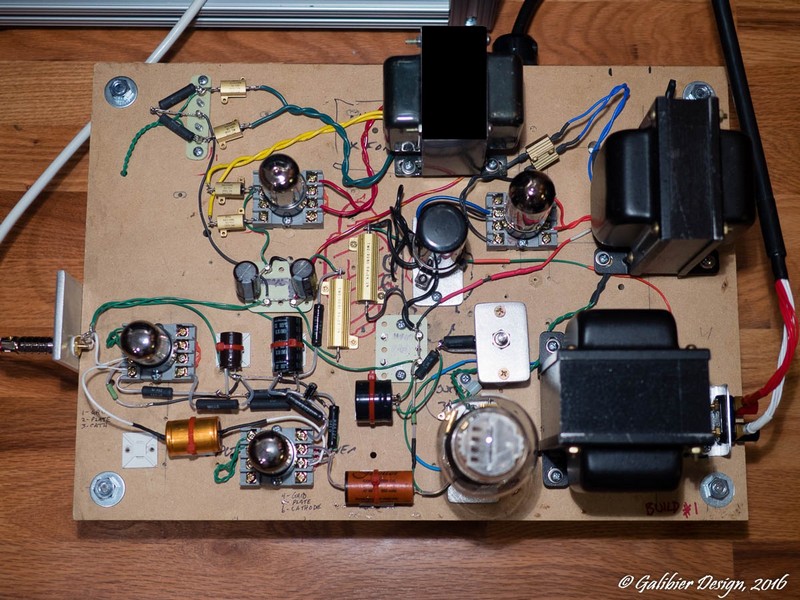
In this post, I’m going to cover my breadboarding approach: selecting the basic architecture, defining/refining the layout along with initial parts selection.
For those of you unfamiliar with the breadboarding concept, think of it as rapid prototyping. The idea is to have a system which allows you to quickly change parts, layout, and architecture.
As your design evolves, you can settle into something that approximates the look of a production amplifier. Bear in mind that moving to this next stage means that the implementation will be less flexible, and it will discourage you from exploring design options and making changes. It’s best to let the design sit a bit before moving to this stage.
The early versions were built on a pair of MDF slabs, measuring 19” wide and about 15” deep. The location of the transformers changed at least a dozen times (I lost count).
Not shown in any of the photos are two filament transformers. They were introduced at about the 6th iteration, while still prototyping on this MDF base.
Many of my respected friends claim that your breadboard amplifier will be the best sounding amp, and that packaging it into its final chassis will result in unavoidable compromises (eddy currents and such).
I have not found this to be the case, and I’ll discuss in a later post.
Breadboarding is a means of testing your circuit and component layout. I’ll use many high quality parts (i.e transformers, resistors and capacitors), but in the initial iterations, there’s no attempt to optimize this. In my humble opinion, a good circuit should benefit from good parts but it should not require them in order to sound good.
I had a pair of amplifiers from a well-known manufacturer in my house and they weren’t working for me. When I quizzed him about this, his first question was “what power cord are you using?” That would not be the first question I asked if I were in his shoes. An amplifier should sound fine with a garden variety power cord. Yes, it will improve with a good one, but if it’s a capable design, it should not require it.
So, if your breadboard circuit sounds bad, parts swapping is not the solution. Revisit your circuit.
In the photos, you’ll see gray, rectangular tube sockets. These are relay sockets and they allow you to easily change the layout. Better sockets sound better, but again … at this point, the object is to flesh out the design/architecture, and the design flexibility conferred by these sockets is beneficial.
There were a few other parts compromises in the early stages – specifically, the hookup wire, input jacks and the binding posts. Capacitors had yet to be experimented with as well.
As the design evolved into the pre-production prototype, a copper ground plane was added, the layout matured (shorter signal path), and parts improvements were implemented.
In
part 3 of this series, the design has matured, and we cover some design changes implemented to clean up the layout and improve serviceability.
Savoie Drive PrototypeShown here is the prototype assembly we rigged up for our upcoming Savoie drive system. The new drive implements a much more robust (and larger) motor. To prototype this, we had to house the drive electronics in an external case as shown in the photo. In the past few months, we began to field questions from
Read More
Tube SubchassisWhile waiting for the first batch of NiWatt chassis from our fabricators, we received our vibration solution from the anodizing shop. We’re turntable guys after all, and vibration and mechanical considerations are never far from our focus. Shown here is a mock-up (click to enlarge). Vibes …We debated implementing a 4 chassis design (external power supply
Read More
(click to enlarge)Hot off the press, we just completed fabrication of a custom arm pillar to install a Kuzma 4Point-9 on a Nottingham Spacedeck. We worked closely with the customer to replicate the key dimensions and adjustment features of the original assembly. Since you will never get a perfect color match (there are infinite variations of black),
Read More
Click to EnlargeOne lucky owner picked up the Koetsu Onyx advertised on our Specials page. We brokered the transaction to ensure that it was as advertised. Needless to say, “new” in box Koetsus are getting more rare by the day. This particular Onyx sample was rebuilt by Sugano the elder and had never been mounted or played until
Read More